
 vue 组件通信深入 Vuex
上一篇博客中,介绍了多种方法来实现组件之间的通信,但是涉及到深层嵌套和非直接关联组件之间的通信时,都会遇到 无法追踪数据和调试的问题,而 vuex 就是为解决此类问题而生的。
这篇博客将简要的介绍 vuex 的基本用法和最佳实践,然后完成下面的 demo
# 1. Vuex 简介
声明:在此仅介绍 Vuex 精华知识,更详尽的知识请参考 Vuex 中文官网 (opens new window)
# 1.1 初识 Vuex
Vuex 是一个专为 Vue.js 应用程序开发的状态管理模式。它采用集中式存储管理应用的所有组件的状态,并以相应的规则保证状态以一种可预测的方式发生变化
Vuex 解决了 多个视图依赖于同一状态 和 来自不同视图的行为需要变更同一状态 的问题,将开发者的精力聚焦于数据的更新而不是数据在组件之间的传递上
# 1.2 Vuex 各个模块
(1)state:用于数据的存储,是 store 中的 唯一数据源
// 定义
new Vuex.Store({
  state: {
    allProducts: []
  }
  //...
})
// 组件中获取
this.$store.state.allProducts
2
3
4
5
6
7
8
9
(2)getters:如 vue 中的计算属性一样,基于 state 数据的二次包装,常用于数据的筛选和多个数据的相关性计算
// 定义
getters: {
  cartProducts(state, getters, rootState) => (getters.allProducts.filter(p => p.quantity))
}
// 组件中获取
this.$store.getters.cartProducts
2
3
4
5
6
(3)mutations:类似函数,改变 state 数据的唯一途径,且不能用于处理异步事件(重点!!!)
// 定义
mutations: {
  setProducts (state, products) {
    state.allProducts = products
  }
}

// 组件中使用
this.$store.commit('setProducts', {//..options})
2
3
4
5
6
7
8
9
(4)actions:类似于 mutation,用于提交 mutation 来改变状态,而不直接变更状态,可以包含任意异步操作
// 定义(shop 为 api)
actions: {
  getAllProducts ({commit}, payload) {
    shop.getProducts(res => {
      commit('setProducts', res)
    })
  }
}

// 组件中使用
this.$store.dispatch('getAllProducts', {//..payload})
2
3
4
5
6
7
8
9
10
11
(5)modules:类似于命名空间,用于项目中将各个模块的状态分开定义和操作,便于维护
// 定义
const moduleA = {
  state: {...},
  mutations: {...},
  actions: {...},
  getters: {...}
}

const moduleB = {
  state: {...},
  mutations: {...},
  actions: {...}
}

const store = new Vuex.Store({
  modules: {
    a: moduleA,
    b: moduleB
  }
})

// 组件中使用
store.state.a // -> moduleA 的状态
store.state.b // -> moduleB 的状态
2
3
4
5
6
7
8
9
10
11
12
13
14
15
16
17
18
19
20
21
22
23
24
注意:默认情况下,模块内部的 action、mutation 和 getter 是注册在全局命名空间的——这样使得多个模块能够对同一 mutation 或 action 作出响应,仅有 state 是局部作用。 因此,常用 getters 将 state 包装后输出,这样可以直接通过 this.$store.getters. 的方式拿到数据,而不用去访问某个模块下的 state
# 1.3 辅助函数
在组件中使用 store 中的数据或方法时,按照上面的说法,每次都要 this.$store. 的方式去获取,有没有简单一点的方式呢?辅助函数就是为了解决这个问题
// 组件中注册
import {mapState, mapGetters, mapMutations, mapActions} from 'vuex'

export default {
  computed: {
    // 数组形式,当映射的计算属性的名称与 state 的子节点名称相同时使用
    ...mapState(['allProducts'])
    // 对象形式,可重命名 state 子节点名称
    ...mapState({
      products: state => state.allProducts
    })
    // 下面为了简便,均以数组形式使用
    ...mapGetters(['cartProducts'])
  },
  methods: {
    ...mapMutations(['setProducts']),
    ...mapActions(['getAllProducts'])
  }
}

// 组件中使用
// 变量
this.allProducts
this.products
// 方法
this.setProducts()
this.getAllProducts()
2
3
4
5
6
7
8
9
10
11
12
13
14
15
16
17
18
19
20
21
22
23
24
25
26
27
由于上面提到,常用的做法是将 state 中数据使用 getter 包装后输出,因此,mapState 在项目中较少遇到,其他三个倒是经常使用,另外,有两个注意项和两个最佳实践:
注意:
- Mutation 需遵守 Vue 的响应规则,见 Vuex 官网 Mutation 部分 (opens new window)
- 表单处理时引发的直接修改 state 中数据 问题,见 Vuex 官网表单处理部分 (opens new window)
最佳实践(后面的 demo 中会引导使用):
- 使用常量替代 Mutation 事件类型,这样可以使 linter 之类的工具发挥作用,同时把这些常量放在单独的文件中可以让你的代码合作者对整个 app 包含的 mutation 一目了然
- store 结构使用如下方式
store
    ├── index.js             # 导出 store 的地方
    ├── state.js             # 根级别的 state
    ├── getters.js           # 二次包装 state 数据
    ├── actions.js           # 根级别的 action
    ├── mutations.js         # 根级别的 mutation
    ├── mutation-types.js    # 所有 mutation 的常量映射表
    └── modules              # 如果有.
        ├── ...
2
3
4
5
6
7
8
9
# 2. Vuex 安装
(1)在项目中安装 Vuex:
npm install vuex --save
(2)在 src 目录下新建 store/index.js,其中代码如下:
import Vue from 'vue'
import Vuex from 'vuex'
// 修改 state 时在 console 打印,便于调试
import createLogger from 'vuex/dist/logger'

Vue.use(Vuex)

const debug = process.env.NODE_ENV !== 'production'

const state = {}
const getters = {}
const mutataions = {}
const actions = {}

export default new Vuex.Store({
  state,
  getters,
  mutataions,
  actions,
  // 严格模式,非法修改 state 时报错
  strict: debug,
  plugins: debug ? [createLogger()] : []
})
2
3
4
5
6
7
8
9
10
11
12
13
14
15
16
17
18
19
20
21
22
23
(3)在入口文件 main.js 中添加:
// ...
import router from './router'
import store from './store'

new Vue({
  el: '#app',
  router,
  store,
  // ...
})
2
3
4
5
6
7
8
9
10
可以对比 vue-router 和 vuex 的安装方式:它们 均为 vue 插件,并在实例化组件时引入,在该实例下的所有组件均可由 this.$router 和 this.$store 的方式查询到对应的插件实例
# 3. Vuex 项目实践
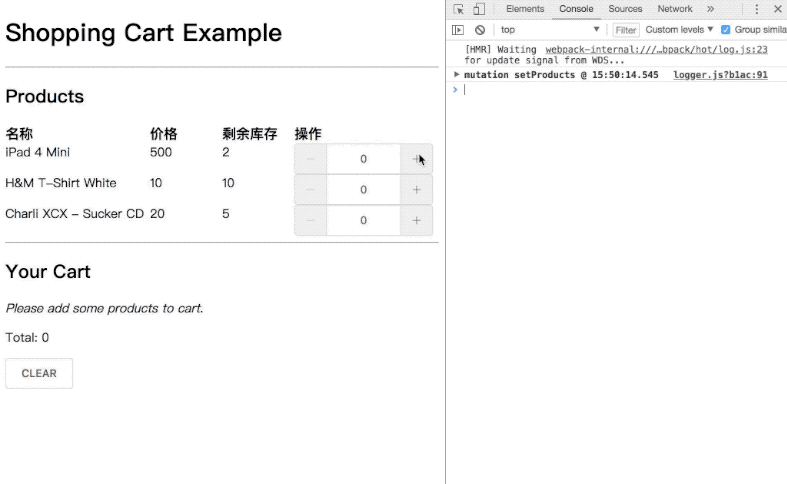
需求:完成在文章开头看到的动图功能【注:demo 源码 (opens new window)】,api 数据和功能如下:
// 商品列表
[
  {'id': 1, 'title': 'iPad 4 Mini', 'price': 500, 'inventory': 2},
  {'id': 2, 'title': 'H&M T-Shirt White', 'price': 10, 'inventory': 10},
  {'id': 3, 'title': 'Charli XCX - Sucker CD', 'price': 20, 'inventory': 5}
]
2
3
4
5
6
功能 1: 商品增减时,库存变化,购物车列表和金额变化 功能 2: 清空购物车时,所有数据还原
分析:
组件结构:一个父组件包裹两个子组件商品列表和购物车;
数据方面:商品列表数据来自于 api 接口 + 加入购物车数目标志,加入购物车商品列表来自商品列表的筛选;
基于上面的分析,可如下组织代码
(1)store 中代码
const state = {
  all: []
}

const getters = {
  // 总商品列表
  allProducts: state => state.all,
  // 购物车商品列表
  cartProducts: (state, getters) => (getters.allProducts.filter(p => p.quantity)),
  // 购物车商品总价
  cartTotalPrice: (state, getters) => {
    return getters.cartProducts.reduce((total, product) => {
      return total + product.price * product.quantity
    }, 0)
  }
}

const mutations = {
  setProducts (state, products) {
    state.all = products
  },
  clearCartProducts (state) {
    state.all.forEach(p => {
      p.quantity = 0
    })
  }
}

const actions = {
  // 获取数据后,加入选取数量 quantity 的标识,以区分是否被加入购物车
  getAllProducts ({commit}) {
    shop.getProducts((res) => {
      const newRes = res.map(p => Object.assign({}, p, {quantity: 0}))
      commit('setProducts', newRes)
    })
  }
}
2
3
4
5
6
7
8
9
10
11
12
13
14
15
16
17
18
19
20
21
22
23
24
25
26
27
28
29
30
31
32
33
34
35
36
37
(2)商品列表组件 ProductList.vue
<template>
  <ul class="product-wrapper">
    <li class="row header">
      <div v-for="(th,i) in tHeader" :key="i">{{ th }}</div>
    </li>
    <li class="row" v-for="product in currentProducts" :key="product.id">
      <div>{{ product.title }}</div>
      <div>{{ product.price }}</div>
      <div>{{ product.inventory - product.quantity }}</div>
      <div>
        <el-input-number
          :min="0" :max="product.inventory"
          v-model="product.quantity"
          @change="handleChange">
        </el-input-number>
      </div>
    </li>
  </ul>
</template>

<script>
import {mapGetters, mapMutations, mapActions} from 'vuex'

export default {
  data () {
    return {
      tHeader: ['名称', '价格', '剩余库存', '操作'],
      currentProducts: []
    }
  },
  computed: {
    ...mapGetters(['allProducts'])
  },
  // 为了避免表单直接修改 store 中的数据,需要使用 watch 模拟双向绑定
  watch: {
    allProducts: {
      handler (val) {
        this.currentProducts = JSON.parse(JSON.stringify(this.allProducts))
      },
      deep: true
    }
  },
  created () {
    this.getAllProducts()
  },
  methods: {
    handleChange () {
      this.setProducts(this.currentProducts)
    },
    ...mapMutations(['setProducts']),
    ...mapActions(['getAllProducts'])
  }
}
</script>
2
3
4
5
6
7
8
9
10
11
12
13
14
15
16
17
18
19
20
21
22
23
24
25
26
27
28
29
30
31
32
33
34
35
36
37
38
39
40
41
42
43
44
45
46
47
48
49
50
51
52
53
54
(3)购物车列表组件 ShoppingCart.vue
<template>
  <div class="cart">
    <p v-show="!products.length"><i>Please add some products to cart.</i></p>
  <ul>
    <li v-for="product in products" :key="product.id">
      {{product.title}} - {{ product.price }} x {{ product.quantity }}
    </li>
  </ul>
  <p>Total: {{ total }}</p>
  <el-button @click="clearCartProducts">CLEAR</el-button>
</div>
</template>

<script>
import {mapGetters, mapMutations} from 'vuex'

export default {
  computed: {
    ...mapGetters({
      products: 'cartProducts',
      total: 'cartTotalPrice'
    })
  },
  methods: {
    ...mapMutations(['clearCartProducts'])
  }
}
</script>
2
3
4
5
6
7
8
9
10
11
12
13
14
15
16
17
18
19
20
21
22
23
24
25
26
27
28
(4)结合上面所说的最佳实践优化:
首先,按照上面的 tree 结构将 store 文件夹拆分;接下来:
在 store 中新建 mutation-types.js 文件,
export const SET_PRODUCTS = 'SET_PRODUCTS'
export const CLEAR_CART_PRODUCTS = 'CLEAR_CART_PRODUCTS'
2
mutations.js 作如下更改:
import * as types from './mutation-types'

export default {
  [types.SET_PRODUCTS] (state, products) {
    state.all = products
  },
  [types.CLEAR_CART_PRODUCTS] (state) {
    state.all.forEach(p => {
      p.quantity = 0
    })
  }
}
2
3
4
5
6
7
8
9
10
11
12
actions.js 作如下更改:
import shop from '@/api/shop'
import * as types from './mutation-types'

export default {
  // 获取数据后,加入选取数量 quantity 的标识,以区分是否被加入购物车
  getAllProducts ({commit}) {
    shop.getProducts((res) => {
    const newRes = res.map(p => Object.assign({}, p, {quantity: 0}))
        commit(types.SET_PRODUCTS, newRes)
    })
  },
  // 这里将 mutation 中的方法以 action 的形式输出,主要是组件中有使用 mutation 的方法,到时仅需引用 mapActions 即可,可按实际情况使用
  setProducts ({commit}, products) {
    commit(types.SET_PRODUCTS, products)
  },
  clearCartProducts ({commit}) {
    commit(types.CLEAR_CART_PRODUCTS)
  }
}
2
3
4
5
6
7
8
9
10
11
12
13
14
15
16
17
18
19
另外,在组件引用 mutation 部分也需要作相应修改
在此仅将 demo 中的核心部分列出,完整的代码请查看 demo 源码 (opens new window)